Replacing a Basic Light Switch
A single-pole switch is the kind that controls a light or a receptacle from one location is the most common type of switch used in residential wiring. (As opposed to a three-way switch. This controls a light from two locations from the top and bottom of a staircase.) Luckily,replacing a single-pole switch is simple and cheap. You'll need a few tools, some know-how and as little as RM3 (USD0.80) for a new switch.
Choosing a New Single-pole Switch
Turn off the power, and then remove the plastic or metal cover plate that fits over your old switch. You'll see some important information printed on the metal face, or yoke, of the switch. The replacement switch you buy should match the amp and volt ratings printed on the old one, If the old switch accepted aluminium wiring (it'll have the abbreviation CO/ALR), make sure the replacement does too. The new switch should also meet a couple of quality standards, whether or not the old one did. It should be UL Iisted and have a grounding screw or a grounding wire. It should also have screw terminals in addition to or instead of push-in ("backwired") terminals. The latter are notorious for losing their connection over time and can never be used with aluminium wire.
Wiring Setup
Your switch will either be wired in the middle of the circuit or in a switch loop. You'll follow the same steps in both cases.
Step by Step
1. Test the circuit, you've already switched off the circuit controlling the switch at your main service panel and removed the switch's cover plate. Now use a voltage tester to test the circuit and make sure the power is off.
2. Remove and test the switch. Use a continuity tester to confirm that the switch is blown and that the problem is not somewhere else along the circuit.
Unscrew the yoke from the wiring box, pull the switch from the wall, and disconnect the wiring. Attach the clip of the continuity tester to one of the brass-coloured screw terminals and touch the probe of the tester to a chrome-coloured screw on the opposite side of the switch. If the switch is working, the bulb on the tester will light when the switch is in the "on" position and not when it's in the "off" position. If the tester light doesn't go on,replace your switch with a new one; if the light does go on, your electrical problem is somewhere else along the circuit.
Tip from the pros: If your switch has only push-in terminals, your continuity tester's probes probably won't reach the switch's terminal contacts, If this is the case, insert a short piece of wire into each push-in terminal, and use the short wires to connect to the tester. Test the switch to diagnose the problem as in step 2. Even if the switch works, it's smart to replace it with one that has screw terminals.
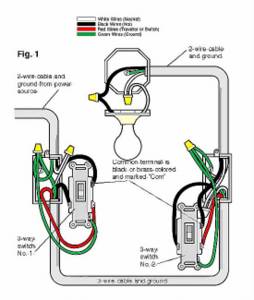
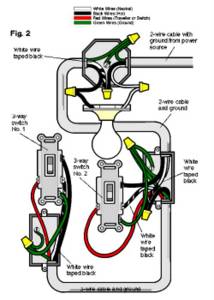
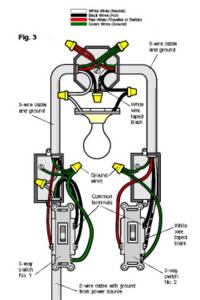
3. Install the new switch. First, use your continuity tester to malswitch is working properly. Then connect the two hot wires from the electrical box to the switch by wrapping the bare ends of the wires clockwise around the brass screw terminals. (If it's a switch loop, one of the hot wires may be a white wire marked black or red see the wiring diagram). Make sure to hold the switch so that up will be "on" and down will be "off." Use a wire connector to connect the grounding wire(s) in the box to the grounding screw or grounding wire on the switch (use a pigtail if necessary).
While you have the box open, check that the wires are in good condition. If any are damaged, wrap them with electrical tape.
4. Turn the power on. Good work, you're done.
Choosing a New Single-pole Switch
Turn off the power, and then remove the plastic or metal cover plate that fits over your old switch. You'll see some important information printed on the metal face, or yoke, of the switch. The replacement switch you buy should match the amp and volt ratings printed on the old one, If the old switch accepted aluminium wiring (it'll have the abbreviation CO/ALR), make sure the replacement does too. The new switch should also meet a couple of quality standards, whether or not the old one did. It should be UL Iisted and have a grounding screw or a grounding wire. It should also have screw terminals in addition to or instead of push-in ("backwired") terminals. The latter are notorious for losing their connection over time and can never be used with aluminium wire.
Wiring Setup
Your switch will either be wired in the middle of the circuit or in a switch loop. You'll follow the same steps in both cases.


Step by Step
1. Test the circuit, you've already switched off the circuit controlling the switch at your main service panel and removed the switch's cover plate. Now use a voltage tester to test the circuit and make sure the power is off.
2. Remove and test the switch. Use a continuity tester to confirm that the switch is blown and that the problem is not somewhere else along the circuit.
Unscrew the yoke from the wiring box, pull the switch from the wall, and disconnect the wiring. Attach the clip of the continuity tester to one of the brass-coloured screw terminals and touch the probe of the tester to a chrome-coloured screw on the opposite side of the switch. If the switch is working, the bulb on the tester will light when the switch is in the "on" position and not when it's in the "off" position. If the tester light doesn't go on,replace your switch with a new one; if the light does go on, your electrical problem is somewhere else along the circuit.
Tip from the pros: If your switch has only push-in terminals, your continuity tester's probes probably won't reach the switch's terminal contacts, If this is the case, insert a short piece of wire into each push-in terminal, and use the short wires to connect to the tester. Test the switch to diagnose the problem as in step 2. Even if the switch works, it's smart to replace it with one that has screw terminals.
3. Install the new switch. First, use your continuity tester to mal
While you have the box open, check that the wires are in good condition. If any are damaged, wrap them with electrical tape.
4. Turn the power on. Good work, you're done.
posted by Jia Ren at 1:58:00 PM
![]()


0 Comments:
Post a Comment
<< Home